# Reading & Writing Files with Open
* Reading Files with Open
- open) provides a File object that contains the methods and attributes you need in order to read, save, and manipulate the file, the first parameter is the file path and file name / the second argument is mode(optional): default value is r

- It is very important that the file is closed in the end. This frees up resources and ensures consistency across different python versions.
# Read the Example1.txt

example1 = "Example1.txt"
file1 = open(example1, "r")

# Print the path of file

file1.name

# Print the mode of file, either 'r' or 'w'

file1.mode

# Read the file

FileContent = file1.read()
FileContent

# Print the file with '\n' as a new line

print(FileContent)

# Type of file content

type(FileContent)

# Close file after finish

file1.close()

"""

This is line 1
This is line 2
This is line 3

"""
- with statement) it automatically closes the file even if the code encounters an exception. The code will run everything in the indent block then close the file object
# Open file using with

with open(example1, "r") as file1:
    FileContent = file1.read()
    print(FileContent)

"""

This is line 1
This is line 2
This is line 3

"""
- We can also read one line of the file at a time using the method readline() - can only read one line at most
with open(example1, "r") as file1:
    print(file1.readline(20)) # does not read past the end of line
    print(file1.read(20)) # Returns the next 20 chars

"""

This is line 1

This is line 2
This

"""
- using a loop(iterate through each line)
# Iterate through the lines

with open(example1,"r") as file1:
        i = 0;
        for line in file1:
            print("Iteration", str(i), ": ", line)
            i = i + 1

"""

Iteration 0 :  This is line 1

Iteration 1 :  This is line 2

Iteration 2 :  This is line 3

"""
- readlines() to save the text file to a list (each element corresponds to a line of text)
# Read all lines and save as a list

with open(example1, "r") as file1:
    FileasList = file1.readlines()
# Print the first line

FileasList[0]

"""

'This is line 1 \n'

"""
* Writing Files with Open
- write) using the method write() to save the text file to a list
# Write line to file
exmp2 = '/resources/data/Example2.txt'
with open(exmp2, 'w') as writefile:
    writefile.write("This is line A")

# we can read the file to see if it worked

# Read file

with open(exmp2, 'r') as testwritefile:
    print(testwritefile.read())

"""

This is line A

"""
- setting the mode to w overwrites all the existing data in the file
* Appending Files
- We can write to files without losing any of the existing data as follows by setting the mode argument to append a
# Write a new line to text file

with open('Example2.txt', 'a') as testwritefile:
    testwritefile.write("This is line C\n")
    testwritefile.write("This is line D\n")
    testwritefile.write("This is line E\n")

# Verify if the new line is in the text file

with open('Example2.txt', 'r') as testwritefile:
    print(testwritefile.read())

"""

Overwrite
This is line C
This is line D
This is line E

"""
* Copy a File (r -> w)
# Copy file to another

with open('Example2.txt','r') as readfile:
    with open('Example3.txt','w') as writefile:
          for line in readfile:
                writefile.write(line)

# We can read the file to see if everything works

with open('Example3.txt','r') as testwritefile:
    print(testwritefile.read())

"""

Overwrite
This is line C
This is line D
This is line E

"""
# Pandas
import pandas as pd
csv_path = 'file1.csv'
df = pd.read_csv(csv_path)
→ df) 'dataframe'
- head) to examine the first 5 rows of the frame (returns dataframe) (df.head())
- a dataframe is comprised of rows & columns
- we can create a dataframe out of a dictionary
: keys = column labels, values or lists = rows
- using the function dataframe, we can cast the dictionary to a dataframe
(e.g songs_frame = pd.DataFrame(songs))
- we can put the data frame name, in this case 'df' (e.g x=df[['Length']] - result is the new dataframe)
- we can do the same thing using the multiple columns
- unique) returns unique elements (e.g df['Released'].unique())
- df['Released']>=1980 returns Boolean Value -> df1 = df[df['Released']>=1980] assign it to df1
- to_csv) save it to .csv formats
* iloc & loc)
= using a row, column number to select the data
df.iloc[0] # select the first row
df.iloc[1] # select the second row
df.iloc[1] # select the second row
df.iloc[-1] # select the last row

df.iloc[:,0] # select the first column
df.iloc[:,1] # select the second column
df.iloc[:,-1] # select the last column

df.iloc[0:5] # select the first 5 rows
df.iloc[:,0:2] # select the first second columns

# gives an error when we give column name in iloc()
<loc> = using label or index to retrieve the data we want

data.loc['Andrade']
# select the row which has an element 'Andrade'

data.loc[['Andrade'],['Veness']]
# select the rows which has elements 'Andrade' and 'Veness'

data.loc[['Andreade','Veness'],['first_name', 'address', 'city']]
# select the rows and columns

data.loc[['Andrade', 'Veness'], 'city':'email']
data[data['first_name'] == 'Antonio', 'email']
# select the only particular row we want
# returns a Series

data[data['first_name'] == 'Antonio', ['email']]
# returns a dataframe
# have to use label when retrieving certain columns

Q) How would you select the Genre 'disco'?

df.iloc[6,4]
df.loc[6,'genre']
df.loc['Bee Gees', 'genre']
Q) How do we select 'Albums The Dark Side of the Moon' to 'Their Greatest Hits(1971-1975)'?

df.iloc[2:6,1]
df.loc[2:5, 'Album']
# Numpy in Python
* One Dimensional Numpy
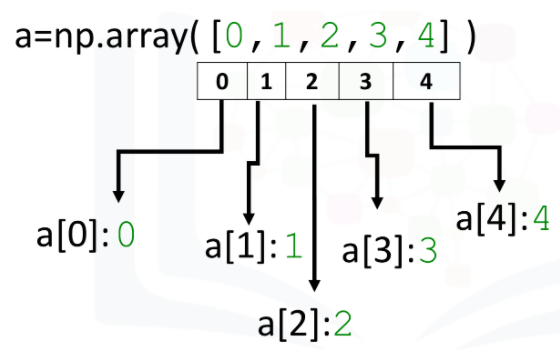
- A numpy array is similar to a list. It's usually fixed in size and each element is of the same type.
# import numpy library
import numpy as np

# create a numpy array
a = np.array([0,1,2,3,4])

# Print each element
print("a[0]:", a[0])
print("a[1]:", a[1])
print("a[2]:", a[2])
print("a[3]:", a[3])
print("a[4]:", a[4])
- Type: we can check the two different types in numpy array
# check the type of the array - we get 'numpy.ndarray'
type(a)

# check the type of the values stored in numpy array - we get dtype('int64')
a.dtype

# we can also create a numpy array with real numbers
- Assign Value: we can change the value of the array
c = np.array([20, 1, 2, 3, 4])
c

# assign the first element to 100
c[0] = 100

# assign the 5th element to 0
c[4] = 0
c
- Slicing: like lists, we can slice the numpy array, and select the new elements and assign it to new numpy array
# slicing the numpy array
d = c[1:4]

# set the 4th element & 5th element to new values as follows
c[3:5] = 300, 400
c
- Assign value with list: we can use the list as an argument in the brackets
# Create the index list
select = [0,2,3]

# Use list to select elements
d = c[select]

c[select] = 10000
c
- Other Attributes
# creat a numpy array
a = np.array([0,1,2,3,4])

# get the size of numpy array
a.size #prints 5

# get the number of dimensions of numpy array
a.ndim #prints 1

# shape is a tuple of integers indicating the size of the array in each dimension
a.shape #prints (5,)

mean = a.mean()
standard_deviation = a.std()
max_a = a.max()
min_a = a.min()
- Array Addition
u = np.array([1,0])
v = np.array([0,1])

z = u + v
# prints array([1,1])
- Array Multiplication = multiplying a vector by a scalar
y = np.array([1,2])

z = 2*y
# prints array([2,4])
- Product of Two Numpy Arrays
u = np.array([1,2])
v = np.array([3,2])

z = u * v
# prints array([3,4])
- Dot Product
np.dot(u,v) # prints 7
- Adding a Constant to a Numpy Array
u = np.array([1,2,3,-1])
u + 1
# prints array([2,3,4,0])
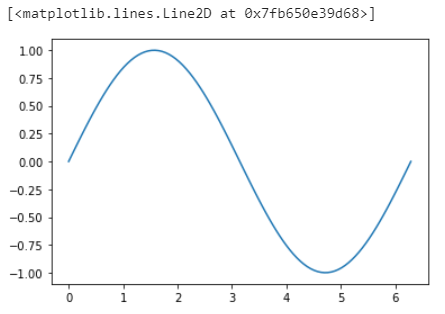
- Linspace: returns evenly spaced numbers over a specified interval, the parameter "num" indicates the number of samples to generate
x = np.linspce(0,2*np.pi,num=100)
y = np.sin(x)
plt.plot(x,y)
* Two Dimensional Numpy
import numpy as np
import matplotlib.pyplot as plt

a = [[11,12,13],[21,22,23],[31,32,33]]
A = np.array(a)

# Show the numpy array dimensions
A.ndim # prints 2

# Show the numpy array shape
A.shape # prints (3,3)

# Show the numpy array size
A.size # 9
- Accessing different elements of a Numpy Array

# we can access the element by following two methods
A[1,2] #23
A[1][2] #23

A[0][0:2] #array([11,12])
- Basic Operations
X = np.array([[1,0],[0,1]])
Y = np.array([[2,1],[1,2]])

Z = X + Y
#Z equals array([[3,1],[1,3]])

K = 2*Y
#K equals array([[4,2],[2,4]])

T = X * Y #element-wise product or Hadamard product
#T equals array([[2,0],[0,2]])

A = np.array([[0,1,1],[1,0,1]])
B = np.array([[1,1],[1,1],[-1,1]]_

C = np.dot(A,B)
#C equals array([[0,2],[0,2]])

#numpy attribute T to calculate the transposed matrix
D = np.array([[1,1],[2,2],[3,3]])
D.T
#prints array([[1,2,3],[1,2,3]])* API
* REST API
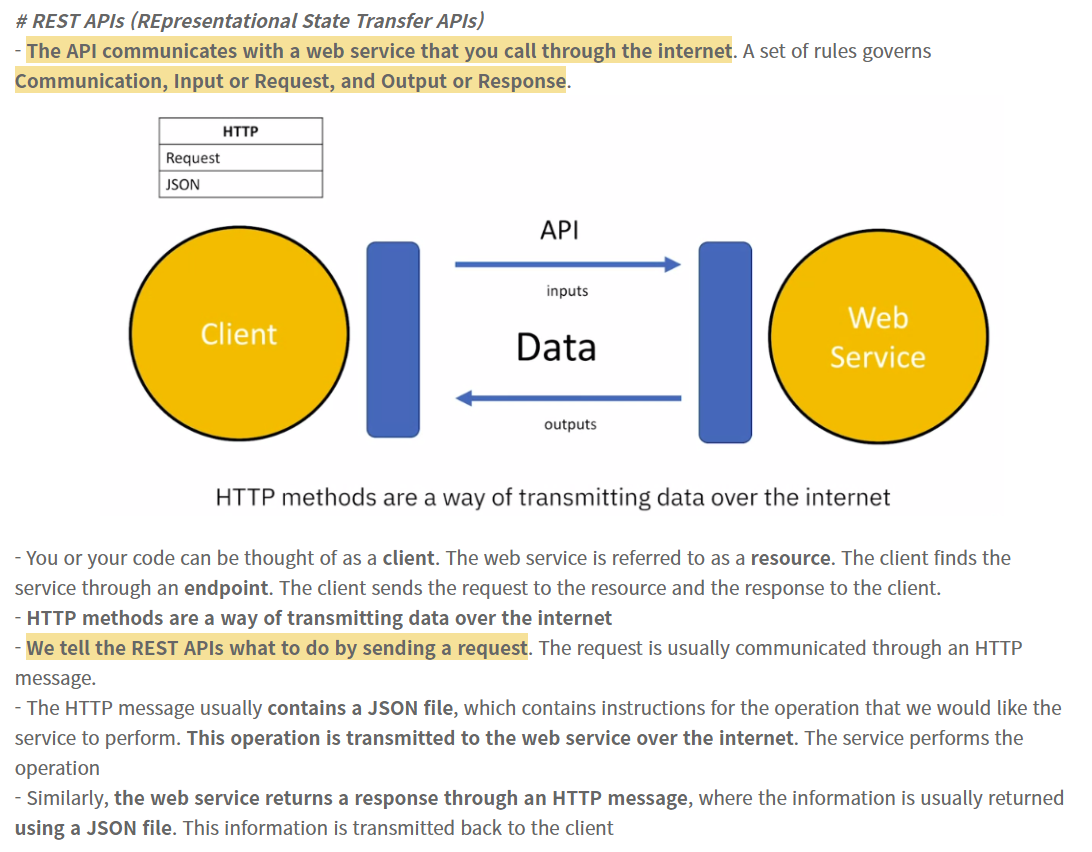
- When the request is made for the information, the web servers sends the requested information
- URL(Uniform Resource Locator) = the most popular way to find resources on the web
(1) Scheme - protocol (http://)
(2) Internet Address or Base URL - will be used to find the location (i.e www.gitlab.com)
(3) Route - the location on the web server (i.e /images/IDSNlogo.png)
* Request and Response
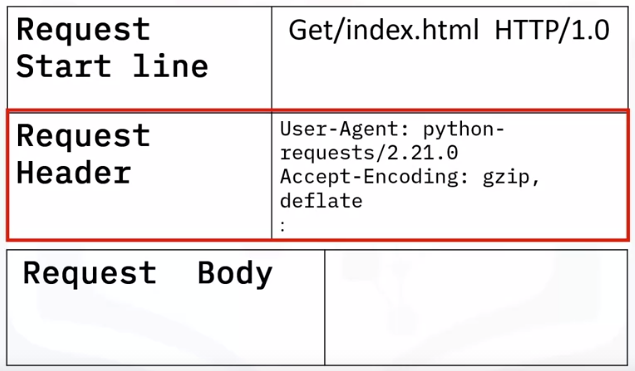
- Request Message
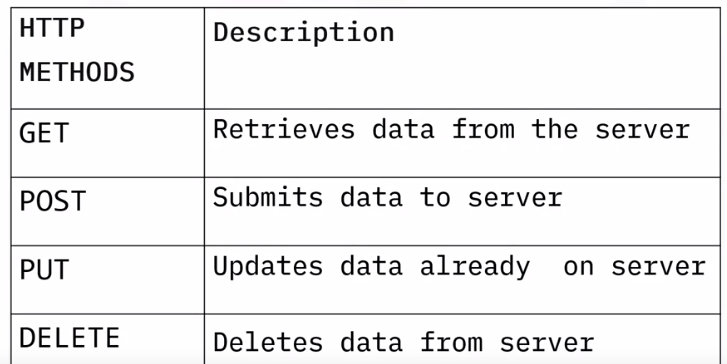
- GET method) requesting the file index.html
(HTTP Methods)
- The Requst Header passes an additional info with an HTTP request
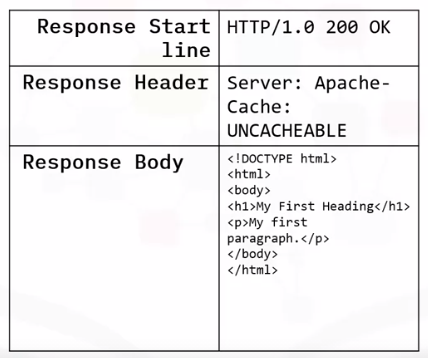
- Response Message
- Status Code

ex) PyCoinGecko for CoinGecko API
- we are getting data on bitcoin using CoinGeckoAPI

!pip install pycoingecko
from pycoingecko import CoinGeckoAPI
cg = CoinGeckoAPI()
bitcoin_data = cg.get_coin_market_chart_by_id(id = 'bitcoin', vs_currency = 'usd', days = 30)
↓↓ click this link to see CoinGekco API example thoroughly ↓↓
REST API example - Coingecko API
👋 저번 시간에 section에서 REST API에 대해 배운 적이 있다..! Tools for Data Science (from Coursera) 1. Data Scientist's Toolkit [1] Languages of Data Science # Python → by far the most popular pr..
sh-avid-learner.tistory.com
ex) Requests in Python 예제
🖐 ibm.com이라는 web service에 접속해보자
→ requests의 get method 반환 객체를 r이라 하면..
① r.status_code ≫ web service와 성공적으로 연결이 되었으면 200을 반환!
(연결이 어떻게 되었는 지 확인하고 싶다면, 그 내용에 맞게 위 첨부한 status_code의 숫자가 반환된다)
② r.request.headers ≫ web service로 요청한 API request의 additional info가 반환됨
③ r.request.body ≫ 요청 API request의 body 내용 반환
④ r.headers ≫ 요청 API request가 아니라, web service에서 요청을 받고 건네주는 response header가 반환됨 (*header 구별 주의!)
⑤ r.headers['Date'] ≫ 요청 및 응답을 건네준 시간 반환
⑥ r.headers['Content-Type'] ≫ 내용이 어떤 형태이고, enoding 형태를 반환
⑦ r.encoding ≫ web-service로 가져온 data의 encoding 형태 반환 (주로 utf-8 - web service에서 가져온 data는 그렇다!) (하단 참고)

⑧ r.text ≫ 실제 web service에서 가져온 data의 내용! (in raw format)
import requests
import os
from PIL import Image
from IPython.display import IFrame

url='https://www.ibm.com/'
r=requests.get(url)
r.status_code #prints 200 if succeeded
print(r.request.headers)
print("request body:", r.request.body) #prints None
header=r.headers
print(r.headers) #this returns a python dictionary of HTTP response headers
header['date']
header['Content-Type']
r.encoding #'UTF-8'
r.text[0:100]
# GET Request with URL Parameters
- You can use the GET method to modify the results of your query
※ 우리는 일종의 web site를 접속할 때도 get method와 같은 똑같은 역할을 수행한다고 할 수 있다. 이 때 get?를 붙여 더 상세한 결과 data를 얻을 수 있음
- in the Route we append /get this indicates we would like to preform a GET request

- query string: a part of a uniform resource locator (URL), this sends other information to the web server. The start of the query is a ?, followed by a series of parameter and value pairs

- 직접 get() 안에 get 뒤 상세 검색을 붙여서 원하는 상세 정보를 가져오는 사례 -
url_get='http://httpbin.org/get'
payload={"name":"Joseph","ID":"123"} #to create a string, add a dictionary
r=requests.get(url_get,params=payload)
r.url
print("request body:", r.request.body)
print(r.status_code)
print(r.text)
r.headers['Content-Type']
r.json()
r.json()['args']
# POST Requests
- Like a GET request a POST is used to send data to a server, but the POST request sends the data in a request body.
Q. GET Request와 POST Request의 차이?
A. request의 body에서 차이가 있다. 상세 data를 얻기 위해 parameter로 넣은 값을 POST의 경우 request body에 집어넣고 web serivce에 요청한다
(그래서 하단 code 결과를 보면 get request body에는 None으로 아무것도 없지만, post request body에는 상세 결과를 찾기 위한 parameter 내용이 들어가 있음)
url_post='http://httpbin.org/post'
r_post=requests.post(url_post,data=payload)
print("POST request URL:",r_post.url ) #http://httpbin.org/post
print("GET request URL:",r.url) #http://httpbin.org/get?name=Joseph&ID=123
print("POST request body:",r_post.request.body) #name=Joseph&ID=123
print("GET request body:",r.request.body) #None
r_post.json()['form']
* HTML for WebScraping
# Beautiful Soup Objects
- Beautiful Soup is a Python library for pulling data out of HTML and XML files, we will focus on HTML files. This is accomplished by representing the HTML as a set of objects with methods used to parse the HTML. We can navigate the HTML as a tree and/or filter out what we are looking for.
!pip install bs4
from bs4 import BeautifulSoup # this module helps in web scrapping.
import requests  # this module helps us to download a web page
- the following HTML:
%%html
<!DOCTYPE html>
<html>
<head>
<title>Page Title</title>
</head>
<body>
<h3><b id='boldest'>Lebron James</b></h3>
<p> Salary: $ 92,000,000 </p>
<h3> Stephen Curry</h3>
<p> Salary: $85,000, 000 </p>
<h3> Kevin Durant </h3>
<p> Salary: $73,200, 000</p>
</body>
</html>
html="<!DOCTYPE html><html><head><title>Page Title</title></head><body><h3><b id='boldest'>Lebron James</b></h3><p> Salary: $ 92,000,000 </p><h3> Stephen Curry</h3><p> Salary: $85,000, 000 </p><h3> Kevin Durant </h3><p> Salary: $73,200, 000</p></body></html>"
- To parse a document, pass it into the BeautifulSoup constructor, the BeautifulSoup object, which represents the document as a nested data structure:
soup = BeautifulSoup(html, 'html5lib')
- the document is converted to Unicode, (similar to ASCII), and HTML entities are converted to Unicode characters. Beautiful Soup transforms a complex HTML document into a complex tree of Python objects.
print(soup.prettify())

"""

<!DOCTYPE html>
<html>
 <head>
  <title>
   Page Title
  </title>
 </head>
 <body>
  <h3>
   <b id="boldest">
    Lebron James
   </b>
  </h3>
  <p>
   Salary: $ 92,000,000
  </p>
  <h3>
   Stephen Curry
  </h3>
  <p>
   Salary: $85,000, 000
  </p>
  <h3>
   Kevin Durant
  </h3>
  <p>
   Salary: $73,200, 000
  </p>
 </body>
</html>

"""
# tag object, Childs, Parents & Siblings
- the Tag object corresponds to an HTML tag in the original document
- If there is more than one Tag with the same name, the first element with that Tag name is called
tag_object=soup.title
print("tag object:",tag_object)

# prints 'tag object: <title>Page Title</title>'

print("tag object type:",type(tag_object))

# prints 'tag object type: <class 'bs4.element.Tag'>'

tag_object=soup.h3
tag_object

# prints '<h3><b id="boldest">Lebron James</b></h3>'
- we can access the child of the tag or navigate down the branch
tag_child =tag_object.b
tag_child

# <b id="boldest">Lebron James</b>

parent_tag=tag_child.parent
parent_tag

# <h3><b id="boldest">Lebron James</b></h3>
# = tag_object

tag_object.parent #parent is the body element

# <body><h3><b id="boldest">Lebron James</b></h3><p> Salary: $ 92,000,000 </p><h3> Stephen Curry</h3><p> Salary: $85,000, 000 </p><h3> Kevin Durant </h3><p> Salary: $73,200, 000</p></body>

sibling_1=tag_object.next_sibling
sibling_1 #sibling is the paragraph element

# <p> Salary: $ 92,000,000 </p>

sibling_2=sibling_1.next_sibling
sibling_2 #sibling_2 is the header element which is also a sibling of both sibling_1 and tag_object

# <h3> Stephen Curry</h3>

sibling_2.next_sibling

# <p> Salary: $85,000, 000 </p>
# HTML attributes
- If the tag has attributes, the tag id="boldest" has an attribute id whose value is boldest. You can access a tag’s attributes by treating the tag like a dictionary
tag_child['id']
# 'boldest'

tag_child.attrs

# {'id': 'boldest'}

tag_child.get('id')

# 'boldest'
# Navigable String
- Beautiful Soup uses the 'NavigableString' class to contain this text
- A NavigableString is just like a Python string or Unicode string, to be more precise. The main difference is that it also supports some BeautifulSoup features. We can covert it to string object in Python
tag_string=tag_child.string
tag_string

# 'Lebron James'

type(tag_string)

# bs4.element.NavigableString

unicode_string = str(tag_string)
unicode_string

# 'Lebron James'
# find_all & find
- The find_all() method looks through a tag’s descendants and retrieves all descendants that match your filters
table_rows=table_bs.find_all('tr')
first_row =table_rows[0]
# <tr><td id="flight">Flight No</td><td>Launch site</td> <td>Payload mass</td></tr>
print(type(first_row))
# <class 'bs4.element.Tag'>
- The find_all() method scans the entire document looking for results, it’s if you are looking for one element you can use the find() method to find the first element in the document
two_tables="<h3>Rocket Launch </h3><p><table class='rocket'><tr><td>Flight No</td><td>Launch site</td> <td>Payload mass</td></tr><tr><td>1</td><td>Florida</td><td>300 kg</td></tr><tr><td>2</td><td>Texas</td><td>94 kg</td></tr><tr><td>3</td><td>Florida </td><td>80 kg</td></tr></table></p><p><h3>Pizza Party  </h3><table class='pizza'><tr><td>Pizza Place</td><td>Orders</td> <td>Slices </td></tr><tr><td>Domino's Pizza</td><td>10</td><td>100</td></tr><tr><td>Little Caesars</td><td>12</td><td >144 </td></tr><tr><td>Papa John's </td><td>15 </td><td>165</td></tr>"

two_tables_bs= BeautifulSoup(two_tables, 'html.parser')

two_tables_bs.find("table")

"""

<table class="rocket"><tr><td>Flight No</td><td>Launch site</td> <td>Payload mass</td></tr><tr><td>1</td><td>Florida</td><td>300 kg</td></tr><tr><td>2</td><td>Texas</td><td>94 kg</td></tr><tr><td>3</td><td>Florida </td><td>80 kg</td></tr></table>

"""

two_tables_bs.find("table",class_='pizza') # class is a keyword, we add an underscore
* Working with Different File Formats
# CSV
- Comma-separated values file format falls under spreadsheet file format. In spreadsheet file format, data is stored in cells. Each cell is organized in rows and columns. A column in the spreadsheet file can have different types. For example, a column can be of string type, a date type or an integer type. Each line in CSV file represents an observation or commonly called a record. Each record may contain one or more fields which are separated by a comma
# JSON
= a lightweight data-interchange format. It is easy for humans to read and write
- JSON is a language-independent data format. It was derived from JavaScript, but many modern programming languages include code to generate and parse JSON-format data. It is a very common data format, with a diverse range of applications
* JSON is built on two structures:
→ A collection of name/value pairs. In various languages, this is realized as an object, record, struct, dictionary, hash table, keyed list, or associative array.
→ An ordered list of values. In most languages, this is realized as an array, vector, list, or sequence.
import json
- Writing JSON to a File
= serialization
= the process of converting an object into a special format which is suitable for transmitting over the network or storing in file or database
→ uses dump() or dumps() function to convert the Python objects into their respective JSON object
import json
person = {
    'first_name' : 'Mark',
    'last_name' : 'abc',
    'age' : 27,
    'address': {
        "streetAddress": "21 2nd Street",
        "city": "New York",
        "state": "NY",
        "postalCode": "10021-3100"
    }
}

# using dump() function - for writing to JSON file
with open('person.json', 'w') as f:  # writing JSON object
    json.dump(person, f)

# using dumps() function - converting a dictionary to a JSON object
# Serializing json
json_object = json.dumps(person, indent = 4)

# Writing to sample.json
with open("sample.json", "w") as outfile:
    outfile.write(json_object)

print(json_object)

# to de-serialize it, we use load() function
- Reading JSON to a File
- It converts the special format returned by the serialization back into a usable object
import json

# Opening JSON file
with open('sample.json', 'r') as openfile:

    # Reading from json file
    json_object = json.load(openfile)

print(json_object)
print(type(json_object))
# XLSX
- we can use pd.read_excel() function
# XML
- XML is also known as Extensible Markup Language. As the name suggests, it is a markup language. It has certain rules for encoding data. XML file format is a human-readable and machine-readable file format
- The xml.etree.ElementTree module comes built-in with Python. It provides functionality for parsing and creating XML documents. ElementTree represents the XML document as a tree. We can move across the document using nodes which are elements and sub-elements of the XML file
import xml.etree.ElementTree as ET

# create the file structure
employee = ET.Element('employee')
details = ET.SubElement(employee, 'details')
first = ET.SubElement(details, 'firstname')
second = ET.SubElement(details, 'lastname')
third = ET.SubElement(details, 'age')
first.text = 'Shiv'
second.text = 'Mishra'
third.text = '23'

# create a new XML file with the results
mydata1 = ET.ElementTree(employee)
# myfile = open("items2.xml", "wb")
# myfile.write(mydata)
with open("new_sample.xml", "wb") as files:
    mydata1.write(files)

tree = etree.parse("Sample-employee-XML-file.xml")

root = tree.getroot()
columns = ["firstname", "lastname", "title", "division", "building","room"]

datatframe = pd.DataFrame(columns = columns)

for node in root:

    firstname = node.find("firstname").text

    lastname = node.find("lastname").text

    title = node.find("title").text

    division = node.find("division").text

    building = node.find("building").text

    room = node.find("room").text

    datatframe = datatframe.append(pd.Series([firstname, lastname, title, division, building, room], index = columns), ignore_index = True)
# Binary Files - Image File
- PIL is the Python Imaging Library which provides the python interpreter with image editing capabilities
# importing PIL
from PIL import Image

import urllib.request
# Downloading dataset
urllib.request.urlretrieve("https://hips.hearstapps.com/hmg-prod.s3.amazonaws.com/images/dog-puppy-on-garden-royalty-free-image-1586966191.jpg", "dog.jpg")

# Read image
img = Image.open('dog.jpg')

# Output Images
display(img)
Result)

* 출처) (COURSERA) <Python for DS, AI, Development>
'Python Language > Fundamentals' 카테고리의 다른 글
| File/Exception/Log Handling (0) | 2022.07.14 |
|---|---|
| python OOP (0) | 2022.07.07 |
| Python Basics(1). (from Coursera) (0) | 2022.04.04 |
| 시계열 데이터 - datetime (0) | 2022.03.24 |
| list comprehension (0) | 2022.03.20 |


댓글